
To deploy software and updates using Microsoft System Center Configuration Manager (SCCM) you need to install a Software Update Point (SUP). The SUP is responsible for integrating with Windows Software Update Services (WSUS) to synchronize software update metadata from Microsoft Update to WSUS and subsequently into SCCM. WSUS services stores its information in the SUSDB database, which is either hosted in a Windows Internal Database (WID) or on a SQL Server. Since the introduction of the SUP in SCCM 2007, administrators have had to take care to optimize and performance maintenance to keep the SUSDB & SCCM DB performing well and to remove the clutter.
With Current Branch Microsoft has introduced new functionality and with the new service model of Windows 10 and Office 365, a lot more clutter! Optimizing and maintaining your WSUS is still a must-have for administrators. This post provides high-level guidance for the SUP configuration and recommendations to optimize and maintain the SUSDB.
Recommendations
The following are recommendations to get the best performance out of your WSUS database and scan performance on clients, and to minimize the clutter in your console!
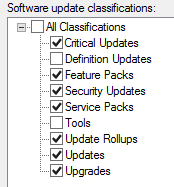
- Only select the Classification & Products that you need on the SUP. It is not too late to go back in and uncheck those chatty ones!
- Host your SUSDB on a SQL Server and not a WID. Further guidance is provided on how to migrate if you need to.
- Perform regular maintenance on your WSUS server:
- Backup the WSUS database
- Enable the cleanup wizard on SUP configuration
- Re-index the WSUS database
- Decline unwanted updates and remove expired updates from any Software Update Groups
Continue reading for guidance on how to accomplish each of these recommendations.
Common Configurations
The following are recommendations to get the best performance out of your WSUS database and scan performance on clients, and to minimize the clutter in your console! There are two key locations you can configure the behavior for software update deployments in SCCM:
Software Update Point component
Administration \ Overview \ Site Configuration \ Sites – Right click on your primary sight > Configure Site Components > Software Update Point
- Sync Settings – Configure upstream server if needed. The default works for most customers to synchronize from Microsoft Update.
- Update Files – Select if you want to use express installation files for Windows 10.
- Classifications – Only select the classifications you need. Do not enable Definition Updates unless you have a strong requirement, such as System Center Endpoint Protection. Do not enable Tools unless you determine there is a need, or Upgrades unless you plan on using the Windows 10 servicing plan to upgrade your devices. I find that most admins prefer a controlled task sequence over a service plan.
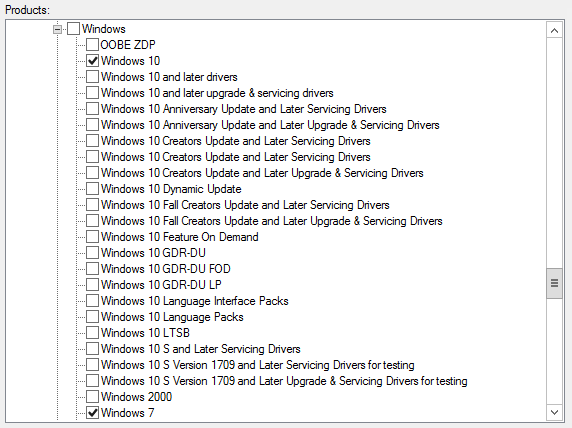
- Products – Only select the products you need. Use inventory to pull reports to determine what is installed in your environment. Be careful not to enable the plethora of Windows 10 product options unless you have a specific need. You can always come back later and enable the product if you find something you need to deploy is missing.
- Sync Schedule – How often you sync depends on your usage of the product. If you are opting to supersede updates immediately, you may want to choose to sync only on patch Tuesday, prior to creating your monthly deployment updates. You may want to sync daily, because you want any superseded updates to be revoked immediately. When choosing a time, I would recommend choosing a later time than the default, to avoid synchronizing when all other customers may be getting their updates from Microsoft. You will also want to be sure the timing of any Automatic Deployment Rules (ADR) to ensure the sync can run and complete prior to their schedule.
- Supersede Rule – You may choose to immediately expire updates and sync daily to revoking any updates Microsoft realizes isn’t up to par. Due to the nature of the monthly rollups that Microsoft is now releasing, this isn’t an option if you are not on a 30-day release cycle. If you have a delay, say for your servers, then you will need to allow at least 1 month before expiring a superseded update. Strongly recommended is to enable the Run WSUS Cleanup wizard. This ensures that updates are cleaned out of WSUS.
- Languages – Select only the language you need for fully localized products. Products with a base English install and language packs only require English.
Client Settings
Administration \ Overview \ Client Settings \ Default Client Settings
You may have multiple client settings targeted to different clients. Those settings will be applied as a higher priority than the defaults. Client settings control the restart behaviors, what software center experience users have, and how often the machine scans for updates. Optimizing these settings will be unique to your SCCM implementation and your organization’s goals and desired user experience. We recommend that you work with a professional consultant or an experienced SCCM administrator to define your client settings.
Update Cleanup
You no longer need to decline superseded updates as the WSUS Cleanup wizard setting on the SUP will take care of business. With the introduction of Office 365 and Windows 10 there is a lot of clutter in the SCCM console and it can be confusing at times to make sure you are deploying only want is needed.
For example, if your practice is to always deploy the Security and Monthly update and you do not deploy the Security-Only, you can decline these so they do not clutter the SCCM console. After an update is declined, and the WSUS sync runs, and cleanup is enabled, the update will drop out of the SCCM console within 7 days. Another example is if you are using the Semi-Annual channel, but you are not using the Monthly channel, you can decline the latter. Some other easy wins might be Preview updates. You get the idea!
You can schedule a script to run to regularly decline unwanted updates based on keywords in the title. A sample script WSUS-Decline.ps1 is provided below. Be very careful when building your list of keywords when choosing to decline updates. You will notice in the sample a couple of pictures below, there is a space after some of the product names, or including the first letter of the platform or service pack (e.g. “Windows Server 2008 x”). This is to avoid declining “Windows Server 2008 R2” updates.
Before building your keyword list, try out the following SQL query in SQL Management Studio for each keyword you wish to add, double checking the results are desired.
Use SUSDB
Select UpdateId, DefaultTitle [Title], PublicationState
From [PUBLIC_VIEWS].[vUpdate]
WITH (NOLOCK) WHERE DefaultTitle Like '%Windows Server 2008%' and IsDeclined = 0
The sample script provided below took about 4.5 hours to run in a production environment for the first run, and subsequent runs ran in less than a minute. You may ask, why is it performing a SQL query instead of using Get-WsusUpdates to return the list of updates? Because it takes an eternity to run otherwise, and I experienced an outage with my server trying!
Here is the script running declining all those annoying preview updates: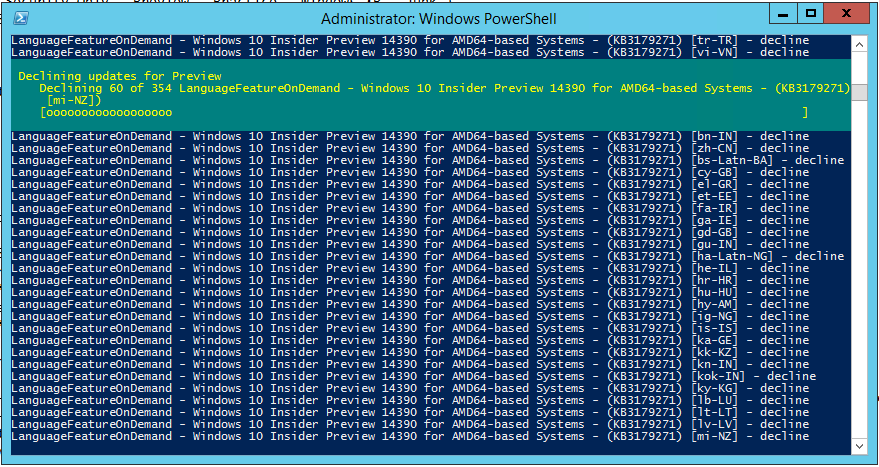
WSUS-DeclineUpdates.ps1
This script sample is provided “as-is”, please use at your own risk. You will need to change the following variables for your environment:
- $WORDS – Change the to the keywords you wish to use to decline updates in your environment.
- $SMSProvider – The host name of your SCCM server with the SMS WMI Provider (typically your primary site server name).
- $SQLServer – The host name of your SQL server hosting the WSUS database (typically the same hosting your SCCM database).
- $SiteCode – Three letter SCCM site code.
#Requires -RunAsAdministrator
cls
$erroractionpreference = 'stop'

#//-----------------------------------------
#// ENVIRONMENT
#//-----------------------------------------

$words = @("Removal","Security Only","Preview","Practice","Readiness",

"Windows XP ","Windows Server 2003 ","Windows Server 2008 S",

"Windows Server 2008 x","Windows Vista ","Junk","Itanium",

"Internet Explorer 7","Internet Explorer 8",

"Internet Explorer 9","Internet Explorer 10")
$SMSProvider = 'SCCM_SERVER_WMIProvider'
$SQLServer = 'WSUS_DATABASESERVER'
$SQLDatabase = 'SUSDB'
$SiteCode = 'SITE_CODE'

#//-----------------------------------------

$iTotal = 0
Get-Date

Write-host "Getting WSUS updates by keywords...."
ForEach ($word in $words) {
	Write-Host "[$Word]"
    $iDeclined = 0
    $iFailed = 0

    #// SCCM query for servers missing client
    $SQLQuery = "Select UpdateId, DefaultTitle [Title],

    PublicationState From [PUBLIC_VIEWS].[vUpdate] WITH (NOLOCK) WHERE

    DefaultTitle Like '%$Word%' and IsDeclined = 0"

    #// Connect o SQL
    $Table = New-Object System.Data.DataTable
    $Con = New-Object System.Data.SQLClient.SQLConnection
    $Con.ConnectionString = "server='$SQLServer';

    database='$SQLDatabase';trusted_connection=true;"
    $Con.Open()
    $Cmd = New-Object System.Data.SQLClient.SQLCommand
    $Cmd.Connection = $Con
    $Cmd.CommandText = $SQLQuery
    $Reader = $Cmd.ExecuteReader()
    $Table.Load($Reader)
    $Con.Close()
    $Count = $table.Rows.Count
    $i = 0
    Write-Host "Found $Count updates"
    If ($Count -gt 0) {
        ForEach ($r in $table.rows) {
		    $i++
            $Title = $r.Title
            $UpdateID = $r.UpdateId
            Write-Progress -Activity "Decline updates for '$Word'" -Status

            "Declining $i of $count | $Title)" -PercentComplete (($i/$Count)*100.0)
            Try {
                $Update = Get-WsusUpdate -UpdateId $UpdateID
                Deny-WsusUpdate -Update $Update
                Write-Host " - Declined | $Title"
                $iDeclined++
                $iTotal++
            } Catch {
                $iFailed++
                Write-Host " - ERROR [$($_.Exception.HResult)]

                $($_.Exception.Message) | $Title"
            }
        }
        Write-Host "** $Word ** Declined [$iDeclined] Failed [$iFailed]"
    }
}
Get-Date

If ($iTotal -eq 0) {
    Write-Host "Skip Sync, no titles declined."
} Else {

    $SUP = [wmiclass]("\\$SMSProvider\root\SMS\Site_$($SiteCode):SMS_SoftwareUpdate")
    $Params = $SUP.GetMethodParameters("SyncNow")
    $Params.fullSync = $true
    $Return = $SUP.SyncNow($Params)

    If ($Return.ReturnValue -eq "0") {
        Write-Host "Sync of SUP successful"
    } Else {
        Write-Host "There was an error syncing the SUP [$($Return.ReturnValue)"
    }
}
Migrate from WID to SQL
If you haven’t already done so, move your WID to SQL! You can use the SUSDB on the same SQL box as your SCCM server database, as the SQL license will be covered for the SUP role as part of the System Center licensing. Please review https://docs.microsoft.com/en-us/windows-server/administration/windows-server-update-services/manage/wid-to-sql-migration prior to performing the following steps.
-
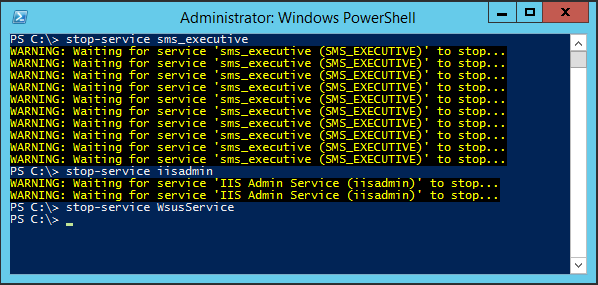
- Stop the all SMS_* services on your primary site server (and server hosting the SUP role if separate)
- Follow the steps documented perform the following steps:
- Detach the SUSDB database from WID
- Attach the SUSDB database & logs to the SQL Server
- Grant the account NT AUTHORITY\NETWORK SERVICE sysadmin permissions
- Modify the WSUS registry keys to map to the SQL Server (Backup the Update Services key prior to making changes)
- Stop the all SMS_* services on your primary site server (and server hosting the SUP role if separate)
NOTES:
-
-
- When using SQL Management Studio on the local server to connect, use \\.\pipe\MICROSOFT##WID\tsql\query for the server name.
- If your initial install of WSUS was done by another administrator and you don’t have rights to connect, perform the following steps to grant yourself SYSADMIN rights:
-
OSQL.EXE -S \\.\pipe\MICROSOFT##WID\tsql\query -E
sp_grantlogin ‘DOMAIN\User’
GO
sp_addsrvrolemember ‘DOMAIN\User’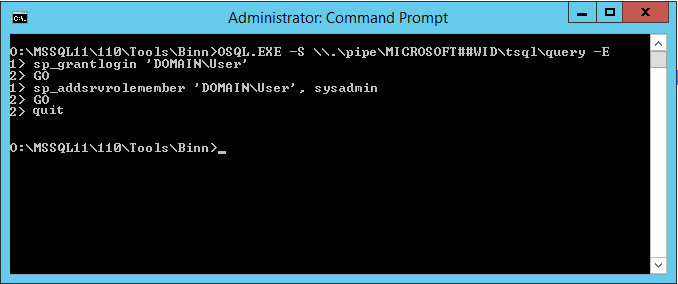
-
- Restart the SMS_EXECUTIVE services
- To validate a successful migration:
- Check the C:\Program Files\Update Services\LogFIles\SoftwareDistribution.log
(Should be no notable errors) - Perform a Software Update Synchronization and check the WSYNCMGR.LOG to confirm a successfully sync with the SUSDB
- Check the C:\Program Files\Update Services\LogFIles\SoftwareDistribution.log

References
To learn more, check out the following references:
- Manage settings for software updates – Configuration Manager
- Plan for Software Updates – Configuration Manager
An additional community article you may find insightful: