
Let’s hope malware never appears on computers you manage. However, it may still find a way. Symantec recently reported 71% of malware attacks start via spear phishing. Users should know better by now, but that’s out of your control. What you can do is prevent malware from executing.
Windows 10 has many innovative features to assist you with securing your device. Windows Defender Application Control (WDAC), previously known as Device Guard, is a key one. Implementing WDAC is a fundamental part of ensuring malicious software and drivers never run on a company’s endpoints.
What Exactly is WDAC?
WDAC, allows you to control your Windows 10 devices by creating policies that define whether a specific driver or application can be executed on a device. Applications or drivers need to be specified as trustworthy, which reduces the threat of executable based malware significantly.
WDAC restricts application usage via a feature called configurable code integrity (CI). CI guarantees that only the trusted code runs from the boot loader onwards. It also hardens the operating system against kernel memory attacks using virtualization-based protection of code integrity (HVCI). WDAC works in-conjunction with Secure Boot, to ensure that boot binaries and the UEFI firmware are signed and have not been tampered with.
A common misconception is that WDAC is an AppLocker replacement. AppLocker also enables you to control which applications and files can run on your system. A key difference is that AppLocker does not offer the chain of trust, from the hardware to the kernel, that WDAC offers.
However, AppLocker can be used effectively to compliment WDAC, to allow the usage of different policies per user on the same device. As a best practice, Microsoft recommends that admins:
- Enforce WDAC at the most restrictive, least privilege level.
- Use AppLocker to granularly fine-tune the restrictions.
How Big a Deal Is Implementation?
WDAC is not a simple solution to implement, in comparison to many other Windows 10 security features. Download the Microsoft TechNet documentation on WDAC and AppLocker in PDF format and you are presented with a whopping 273 pages of content to consume.
WDAC requires UEFI firmware. There is no workaround to this. WDAC’s integration with hardware for security is a key reason why it is so powerful. You will have to figure out which machines are capable of running WDAC, and decide what do about the rest. If you have systems running in legacy BIOS that are capable of running UEFI, you can automate the conversion. This free community tool gives you all the information you need for unattended conversion using ConfigMgr.
Not only do you have to get to grips with the WDAC concepts and implementation, but you need to have a full understanding of your business’s application portfolio. You must also have full control of deployment and management of your apps. No allowances here for application chaos.
To implement WDAC in the enterprise, the following process needs to be implemented. This is WDAC in its simplest form:
- Build a reference machine with all the business’s applications installed.
- Ensure the machine is free of viruses and malware.
- Create a WDAC policy in PowerShell and execute against the device, in audit mode initially.
- Deploy the policy against a device—in audit mode.
- Delete the Audit Mode Enabled option from the policy so it becomes enforced, and test against a device.
- Rename the policy to SIPolicy.p7b and copy it to C:\Windows\System32\CodeIntegrity for testing in enforced mode.
If further policies are created, then these need to be merged since only one WDAC policy is allowed per device.
WDAC policies identify trusted applications by their signing certificate. This is done either using embedded signing, where the signature is part of the binary, or via catalog signing, where a catalog file is generated for the application and is signed. The latter method usually works well with unsigned Line of Business (LOB) applications, where embedded signing cannot be easily achieved.
The disadvantage of catalog signing from a WDAC perspective, however, is that catalogs need to be updated every time an application is updated. This requires a change in WDAC policy to accommodate, whereas embedded signing usually does not require this change. Code signed applications therefore reduce the administrative overhead of WDAC implementation within the enterprise.
Use ConfigMgr To Simplify WDAC Implementation
Since Windows 10 1703, a new option, known as the managed installer has been provided to automatically authorize applications deployed by a software deployment solution. I’ll explain how to deploy with Microsoft System Center Configuration Manager (ConfigMgr) specifically.
The managed installer simplifies WDAC implementation by not requiring the administrator to specify explicit rules for software that is being managed through ConfigMgr. Using ConfigMgr covers the following: a pre-defined circle of trust for the ConfigMgr client binaries and its dependencies, Windows OS components, Store apps and any application which is deployed by ConfigMgr.
Managed installer is a heuristic-based mechanism and is best suited on devices where standard users are configured. It is also worth noting that managed installer does not cater for applications that self-update, or ones that extract and execute during installation. It also does not authorize drivers. In these cases, a policy must exist to allow them to run.
Be aware that when the policy is processed on a client device and the ConfigMgr client is the managed installer, any applications deployed post this event are trusted. However, software installed previously is not trusted.
To use WDAC in your ConfigMgr environment, you must enable pre-release features for the whole hierarchy. Once enabled, you can turn on specific pre-release features.
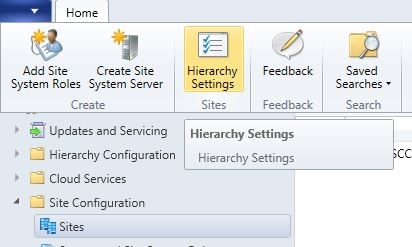
To allow pre-release features to be used, navigate to \Administration\Overview\Site Configuration\Sites. Select your site and then click the Hierarchy Settings button in the ribbon.
In the General tab, select Consent to use Pre-Release features. Once switched on, this change cannot be reversed. You’ll notice that in the screenshot below, the checkbox is greyed out, this is because the feature had been enabled previously.

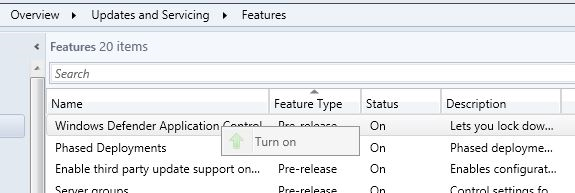
With consent enabled, the next step is to turn on the Windows Defender Application Control feature itself. Pre-release features are located in \Administration\Overview\Updates and Servicing\Features in the ConfigMgr console.
Right-click the feature and Turn on.
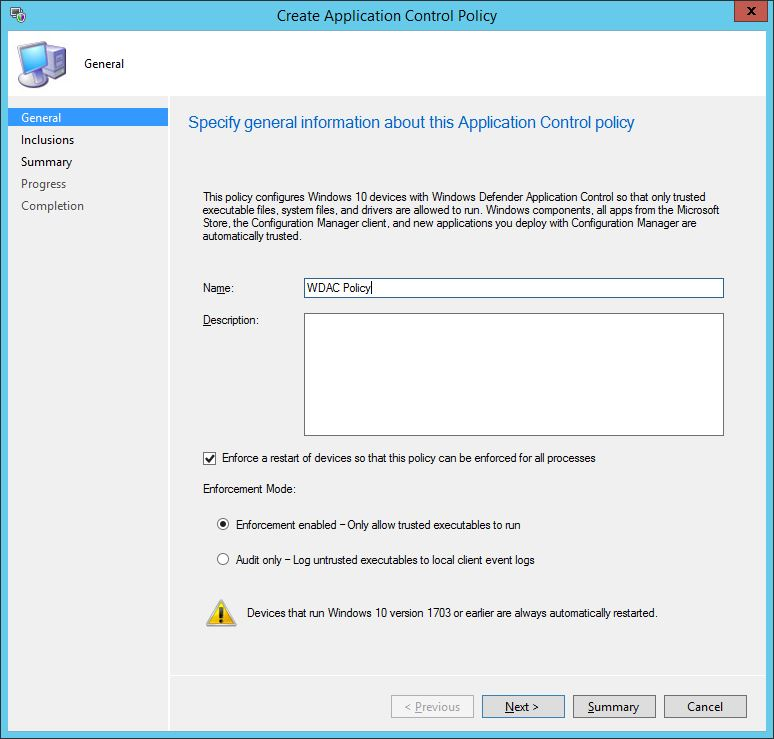
To create the WDAC policy, navigate to \Assets and Compliance\Overview\Endpoint Protection\Windows Defender Application Control. Right-click Windows Defender Application Control and choose Create Application Control Policy.

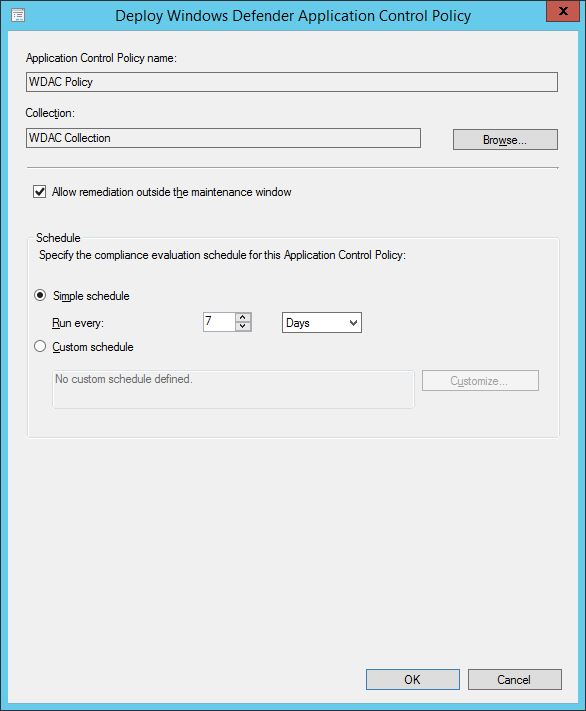
The Create Application Control Policy will drive you through the configuration of the WDAC policy in a few simple steps. Start off by defining the name for the policy and then deciding whether you should enforce a restart on clients to enforce the WDAC policy. At this stage you should also decide whether run in your policy in Audit mode or start the enforcement.
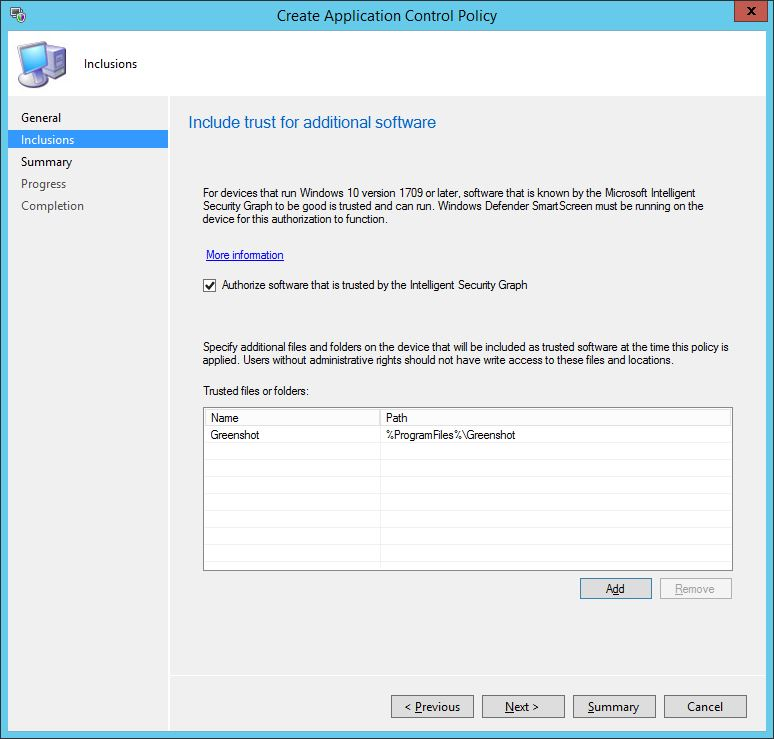
In the next screen of the wizard, you can specify additional files and folders on the device to become trusted. This is a crucial step if you have LOB apps that can’t be deployed via ConfigMgr, or you have applications that are pre-installed into your operating system image. Some careful consideration is needed at this stage. There is also a checkbox whereby you can automatically authorize software trusted by the Intelligent Security Graph – more on that feature shortly.
Once the policy is defined, you can deploy it out to a targeted collection. You can set a compliance schedule and also allow remediation outside of any specified maintenance windows.
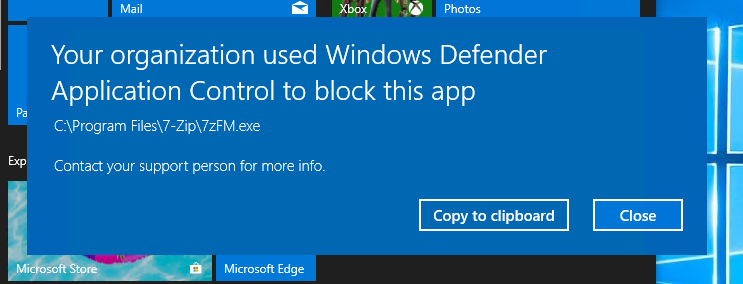
If you have any untrusted applications, once the policy is applied you’ll be notified that WDAC is blocking the application from being used. In the example below, I manually installed 7-Zip on my device, the installation hadn’t been performed by the managed installer, hence its execution is a no-go.
Simplify WDAC Implementation via Intune
WDAC is built into Intune so you can deploy out your policy to your Intune managed devices. It’s super easy to configure.
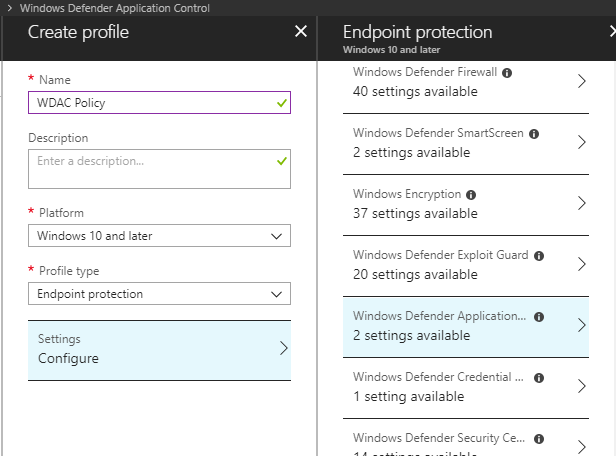
In the Intune blade, navigate to Device configuration\Profiles and choose Create Profile. Enter a name for the policy, choose Windows 10 and later for the Platform and select Endpoint Protection from the Profile type drop down. You’ll notice that there are two settings available for WDAC.
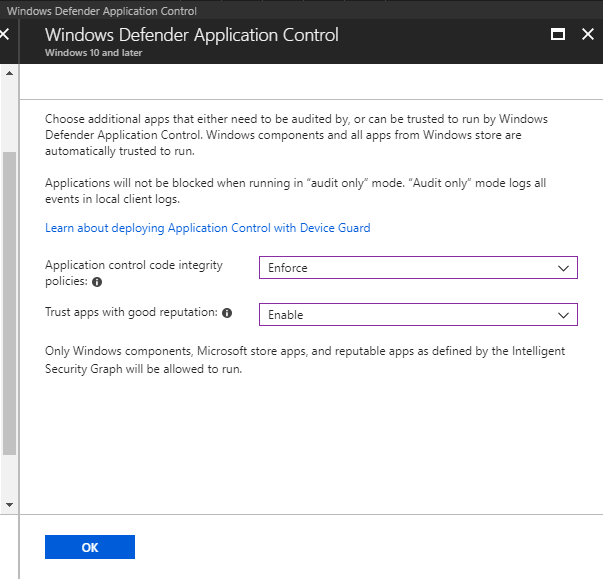
If you select the settings, you can choose to run the WDAC policy in Enforce or Audit mode and you can choose to Trust apps with a good reputation. Note that, ‘Only Windows components, Microsoft store apps, and reputable apps as defined by the Intelligent Security Graph will be allowed to run.’ Hey there it is again, the Intelligent Security Graph, which we saw in our ConfigMgr policy wizard.
What Is the Intelligent Security Graph (ISG)?
The ISG taps into Microsoft’s vast intelligence and threat analytics data and assists with classifying applications as having a good reputation. When application files are executed, the data from the ISG is used to assist the WDAC policy with authorizing the decision.
If no deny rules exist in the deployed policy, then the reputation classification data will be utilized to authorize the application. ISG is another great way of reducing the complexity of enabling WDAC in your environment. Be aware that ISG is an option available to devices running Windows 10 1709 onwards.
Closing Thoughts
Kickstarting Windows Defender Application Control is not an easy task, you need to take control of your application estate and many businesses aren’t at that mature state yet. If you are migrating to Windows 10, though, then use this as the perfect opportunity to identify those applications, reduce the chaos and regain control.
With WDAC policy management options available via ConfigMgr and Intune, you can start to implement the feature with relative ease and cut down the complexity and secure your desktop beyond simple virus and malware management. It makes real sense, in this always connected world, to reduce the attack surface and WDAC makes this possible.