
Pre-Release Disclaimer
Don't let the "pre-release" label discourage you entirely server groups may be just what you’ve been looking for. The feature gives you the ability to group servers together by a collection, and specify a controlled order in which software updates (aka patches) can be applied to a machine.
Microsoft introduced servicing server groups in Microsoft System Center Configuration Manager (ConfigMgr) 1606 as a pre-release feature. As such, it was “use at your own risk.” Microsoft has continued to improve server groups, but the feature is still considered pre-release. However, with ConfigMgr 1710, I would upgrade its status to “somewhat functional.” This article is based on lab testing performed using ConfigMgr 1710.
What Are Server Groups?
Server groups are a collection setting available when you enable the Pre-release – Server Groups feature. By grouping servers together, you can specify a controlled order in which software updates (aka patches) can be applied to a machine. You can specify a specific one-by-one order, a set number of machines that can be patched at once, or a percentage of machines in the collection that can be patched at once. In addition, you can define a PowerShell script to run on a machine before and after patches are installed.
The primary use case envisioned by Microsoft is to patch servers that are part of a cluster, allowing you to control the order in which they are patched, and giving you the ability to add scripts which can drain that node, or perform other automated tasks pre/post patching. This functionality can also be useful for servers with dependencies on each other that need to be patched in a specific order, such as an application with a web front-end hosted on one server, and the back-end database hosted on another.
You may not need to run a script or control the specific order of patching, but you may have a bank of non-persistent virtual desktops in a Citrix cluster, which you need to patch. In that case, you may only want to allow 25% percent of your clients patched at a time. Server groups, for desktops, would come in handy in this case.
How Do I Enable Server Groups?
You must first enable pre-release features in your hierarchy:
- In the console, go to Administration\Overview\Site Configuration\Sites.
- Select your primary site, and choose the Hierarchy Settings on the ribbon.
- On the [General] tab, click the Consent to use Pre-Release features, and click OK.
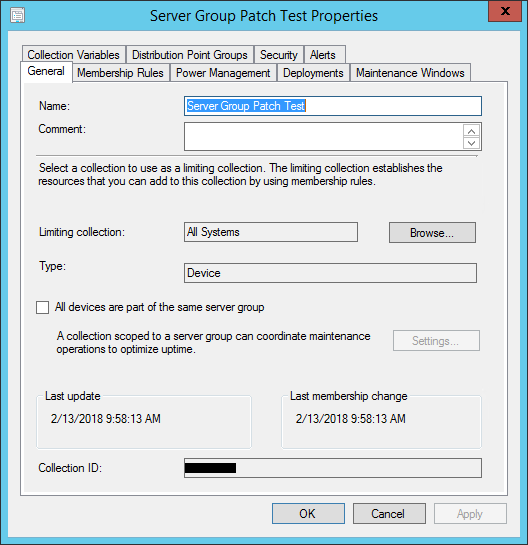
After enabling this, feature you will now see an additional option on collections in the [General] tab to check the box for All devices are part of the same server group. Once enabled you can click on the [Settings…] button to make the magic happen!
Configuring a Server Group
After enabling the Server Group pre-release feature, you want to create a collection with your desired devices. For the purposes of this blog, I’ve setup in my lab two Windows Server 2008 R2 servers named CLIENT1 and CLIENT2. In this case I want to ensure that CLIENT1 patches before CLIENT2, and I want to receive email notifications at the pre/post phase of each server.
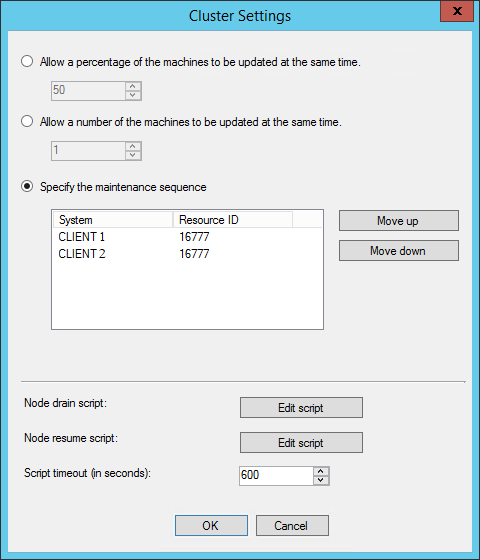
Once you check the All devices are part of the same server group you can click on the [Settings…] button to get the following options:
- Allow a percentage of machines to be updated at the same time
- Allow many machines to be updated at the same time
- Specify the maintenance sequence
- Configure Node drain / Node resume PowerShell scripts to run to perform actions before and after patching
PowerShell Node Drain and Resume Scripts
You can use the [Edit Script] button on the server group collection settings. The description lets you know to exit the script with either 0 for success, a 3010 for restart needed, or a non-zero for a failure.
The first thing you will find is that the script is limited to 512 characters. Which is a little baffling, considering that the database column is 4000 characters. Hopefully Microsoft will improve this in future release. To work around this limitation, I used this to call a script on a network path (e.g. \\MYSERVERVER\Patch\PatchDrain.ps1 and PatchResume.ps1). You will want to ensure that computer accounts of the servers in the group have read access to the share and the script. In my lab, I just set the access to EVERYONE read.
My biggest take away from trying different scenarios is the script feature is not very robust. It doesn’t capture any of the output to the SCCM client log, so you will want to implement as much logging within your scripts as possible. In my case, I appended all log info to the C:\windows\temp\patch.txt file to enable troubleshooting easier.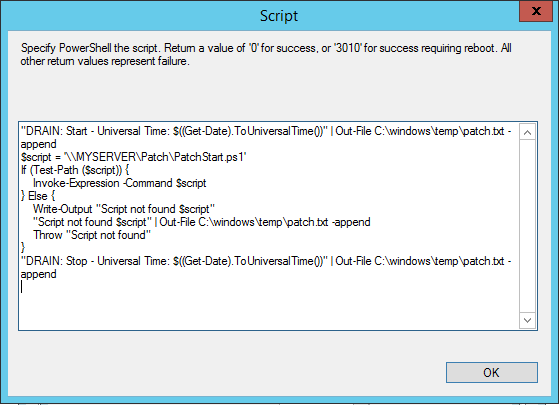
Node Drain and Resume Script
The following is my example of how to add a script which invokes a script on a network share to perform the Node Drain for pre-flight patch operations, and the Node Resume for post-flight patch operations.
Node Drain
"DRAIN: Start - Universal Time: $((Get-Date).ToUniversalTime())" |
   Out-File C:\windows\temp\patch.txt -append
$script = '\\MYSERVER\Patch\PatchDrain.ps1'
If (Test-Path ($script)) {
    Invoke-Expression -Command $script
}Else {
  Write-Output "Script not found $script"
  "Script not found $script" | Out-File C:\windows\temp\patch.txt -append
  Throw "Script not found"
}
"DRAIN: Stop - Universal Time: $((Get-Date).ToUniversalTime())" |
  Out-File C:\windows\temp\patch.txt -append
Node Resume
"RESUME: Start - Universal Time: $((Get-Date).ToUniversalTime())" |
   Out-File C:\windows\temp\patch.txt -append
$script = '\\MYSERVER\Patch\PatchResume.ps1'
If (Test-Path ($script)) {
    Invoke-Expression -Command $script
}Else {
  Write-Output "Script not found $script"
  "Script not found $script" | Out-File C:\windows\temp\patch.txt -append
  Throw "Script not found"
}
"RESUME: Stop - Universal Time: $((Get-Date).ToUniversalTime())" |
  Out-File C:\windows\temp\patch.txt -append
Patch Drain Script
The drain script which is hosted on the network share, stops the services prior to patching. This is also where you may want to put in any other pre-flight actions needed to ensure machine is in proper state for a patch and potential restart. This script leverages SMTP to send notifications of the process to make troubleshooting easier.
$ErrorActionPreference = 'stop'
#// Functions
Function SendMail($subject,$message,[switch] $fail = $False) {
    Write-Output "$subject`: $message"
    $smtp.Send($from,$to,$subject,$message)
    If ($Fail) {Throw $message}
}
Function StopService($Computer, $ServiceName) {
  $Service = Get-Service $Servicename -ComputerName $Computer
-ErrorAction Ignore
  If ($Service) {
      Try {
          $Service | Stop-Service -Force
          Write-Output "[$ServiceName] stopped - $Computer"
      } Catch {
          SendMail $sub "[$ServiceName] Failed stop service -
   $Computer [$($Err.Exception.HResult)] $($Err.Exception.Message)" $true
        }
    }Else {
       SendMail $sub "[$ServiceName] service not found" $true
    }
}

#// SMTP Config
$smtp = New-Object Net.Mail.SmtpClient($mail)
$mail = 'mail.mycompany.com'
$from = 'SCCM@mycompany.com'
$to = 'servergroup@mycompany.com'
$sub = "Patch Start Script on [$env:Computername] $Node"
#// Services to be stopping prior to patching
$Services = ('myservice')
ForEach ($svc in $Services) {
    StopService $env:computername $svc
}

SendMail $sub "Patch start script - End"
Patch Resume Script
The resume script like the drain script, except it ensures the services are running instead of stopped. It also sends email notification if they are not running.
$ErrorActionPreference = 'stop'
#// Functions
Function SendMail($subject,$message,[switch] $fail = $False) {
    Write-Output "$subject`: $message"
    $smtp.Send($from,$to,$subject,$message)
    If ($Fail) {Throw $message}
}

Function StartService($Computer, $ServiceName) {
  $Service = Get-Service $Servicename -ComputerName $Computer
      -ErrorAction Ignore
  If ($Service) {
      #// Return if service alreayd running
      If ($Service.Status -eq 'Running') {
            Write-Output "[$ServiceName] Running - $Computer"
            Return
        }

        #// Start service
     Try {
            $Service | Start-Service
            Write-Output "[$ServiceName] started - $Computer"
     } Catch {
         SendMail $sub "[$ServiceName] Failed start service -
         $Computer [$($Err.Exception.HResult)]
         $($Err.Exception.Message)" $true
      }
    }Else {
       SendMail $sub "[$ServiceName] service not found" $true
    }
}

 #// SMTP Config
 $smtp = New-Object Net.Mail.SmtpClient($mail)
 $mail = 'mail.mycompany.com'
 $from = 'SCCM@mycompany.com'
 $to = 'servergroup@mycompany.com'
 $sub = "Patch Resume Script on [$env:Computername]"

 SendMail $sub "Patch start script - Begin"

 #// Start services
 $services = ('myservice')
 ForEach ($svc in $Services) {
    StartService $env:Computername $svc
}

 SendMail $sub "Patch resume script - End"
Server Group Patching in Action
Once you have applied the server group settings, these will apply to any patch deployments to the servers in the patch group. You do not need to use the same collection for pushing the patches to. Things you will want to be careful of:
- Ensure all the servers are in the same service Maintenance Window (if used)
- Clear any server group deployment locks before disabling server group settings
Once you have deployed the updates, each client in the server group will check in with the MP, and determine what its lock state is. You can see this in the C:\Windows\CCM\Logs\UpdateDeployments.log file. It will show the status of Waiting for lock in the console.
Getting a List of Devices with Server Group Collection Settings
To get a list of all collections and settings from SQL Management Studio using the vSMS_CollectionSettings view:
 Select
	c.Name [CollectionName],
	LastModificationTime,
	UseCluster,
	UseClusterPercentage,
	PreAction,
	PostAction,
	ClusterCount,
	ClusterPercentage,
	ClusterTimeout
 From
	vSMS_CollectionSettings cs join v_Collection
              c on cs.CollectionID = c.CollID
Where
	UseCluster = 1
The following columns of the
- UseCluster – Enabled (1) or Disable (0)
- UseClusterPercentage, – Enabled (1) or Disable (0)
- PreAction, – Script run prior to installing updates.
- PostAction – Script run after install of update
- ClusterCount – Number of machines to update (if use cluster percentage disabled)
- ClusterPercentage – What percentage of machines to update
- ClusterTimeout – Timeout for node drain/resume scripts
You may also leverage the SMS_CollectionSettings to programmatically set or change the collection settings for server groups.
Clear Server Group Locks
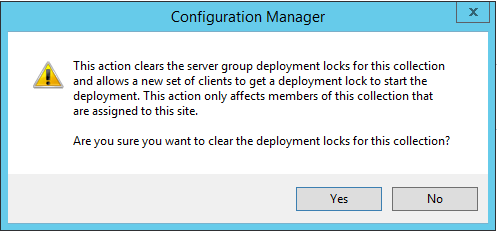
You may want to clear a lock to allow a server to patch without waiting for the server group sequence. You can accomplish this by right-clicking on the collection and choosing Clear Server Group Deployment Locks. It is also recommended to do this before disabling the settings on a collection. Once you remove the settings the clear locks option is grayed out, even if there are active locks on the collection.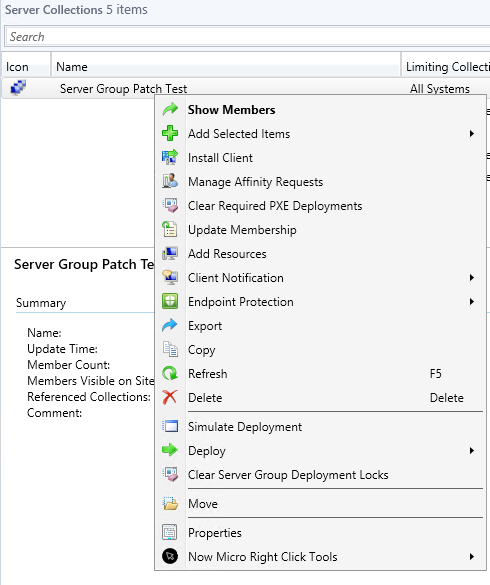
 In my test client, shortly after clearing the lock, you can see the Lock State change from a 2 to a 0, allowing the updates to proceed.
Getting a list of clients in the patch lock
To get a list of the existing locks in place, you can use the following query to check from SQL Management studio.
 Select
    c.Name [CollectionName], s.Name0 [SystemName],
    dm.[State], dm.[TimeStamp]
 From DeploymentMutex dm
	join v_R_System s ON s.ResourceID = dm.ResourceID
	join  v_Collection c ON c.CollID = dm.CollectionID
 Order By c.Name, dm.[State] Desc
The following is an example of results of a lock on a client in a server patch group.
Lock States
There are four lock states:
- Waiting for Lock: 0
- Have Lock: 1
- Released Lock: 2
- Node Script Failed: 3
In my tests I found that clients cycled in the wait for lock (state 0) every 15 seconds for the first 5 minutes, and then it began checking every 5 minutes for a lock status. The site server controls who can patch by granting a lock (state 1). Once a server has installed patches, restart, and run the node resume script, then it releases the lock (state 2).
References
To learn more, check out Microsoft's documentation Service a server group.