
BitLocker disk encryption technology has been a part of the Windows operating system since Windows Vista. It didn’t really hit its stride until Windows 8.1, and now with Windows 10, it’s almost perfect (in terms of compatibility and manageability).
Bottom line as to why you should use it—it just works. It can be enabled during the imaging process from both MDT and ConfigMgr, or enabled via script and controlled by Group Policy. The decryption and recovery keys can be stored in Active Directory or the Microsoft BitLocker Administration and Monitoring (MBAM) product. There are also several decryption methods, such as TPM unlock, smart card requirements, or PIN requirements. All in all, it’s very versatile and totally manageable.
This post assumes that you are running Windows 10 Creators Update on a device that has a TPM module. Also, the ConfigMgr options assume at least version 1702. If you are not running any of these requirements, all features may not be available.
Decryption Methods and Combinations
There are several methods to unlock a BitLocker drive. All the methods are a combination of USB key, password (or PIN), and the TPM module. The TPM module stores the decryption key and only releases it on boot of the disk. The USB method stores the decryption key on a USB drive that must be inserted in the machine at boot. This method can also utilize a smart card. The password method is exactly what it says: the user must type a password to unlock the disk. These three methods can be used in these combinations:
TPM only
TPM + password
TPM + USB
TPM + password + USB
USB only
Password only
Enable During ConfigMgr Task Sequence
Enabling BitLocker is done with two task sequence steps. First, you must Pre-provision BitLocker. This must be done after you have partitioned the disk and before you apply the operating system.
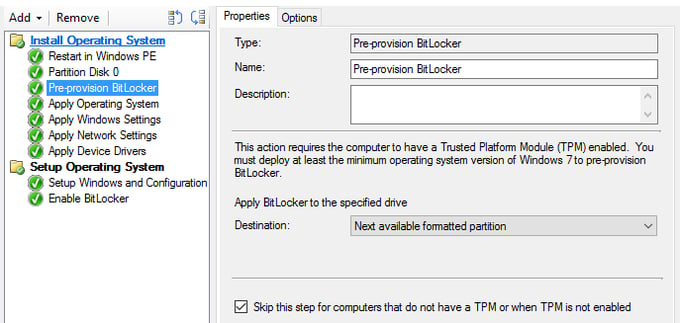
Since the drive has no data at this point, this step runs very fast. This step also assumes that you have a TPM chip, so I recommend keeping the bottom check-box enabled. This step also does not set the protection method. That is done with the second step.
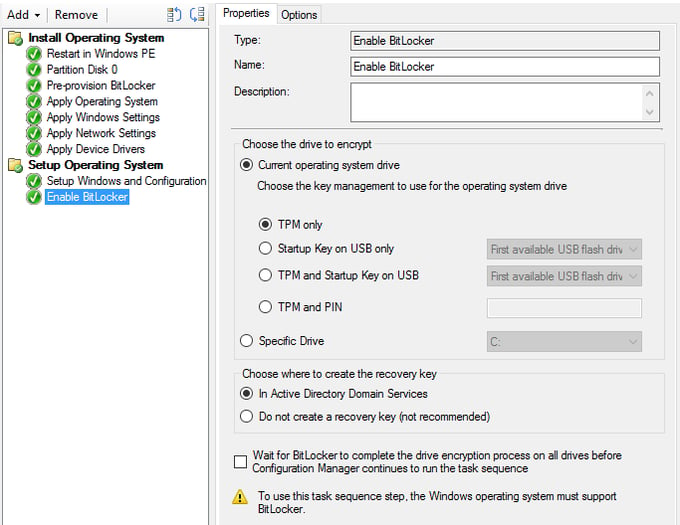
Because BitLocker has already been provisioned, this step also runs very fast. It also gives you most options detailed above, expect for TPM + password + USB. If you want this option, you must configure it from Group Policy. Also, the ConfigMgr step only gives you a PIN option instead of a password. This step will automatically escrow the recovery key into Active Directory, but it will not do anything with MBAM. This step is good for basic BitLocker deployments. The other drawback to this step is setting a PIN. This would be a standard value for all devices imaged using this task sequence, so you would want users to change it after imaging.
The “Pre-Provision BitLocker” step does not have to be used in conjunction with the “Enable BitLocker” step. You can use the pre-provision step with the “manage-bde” command utility or the BitLocker PowerShell cmdlets for more advanced options.
No ConfigMgr? No Problem
If you do not have ConfigMgr, or your devices are already deployed, you must use a script to enable BitLocker. Microsoft provides a good one that can be downloaded here: gallery.technet.microsoft.com. You can execute this script from Group Policy, or deploy via ConfigMgr.
Once the script is activated, you can configure the options for BitLocker from Group Policy. The Group Policy settings for BitLocker are located at Computer Configuration > Administrative Templates > Windows Components > BitLocker Drive Encryption.
There are a lot of advanced options for BitLocker available in Group Policy. I suggest looking at them and deciding what is best for your organization. I am going to hit the highlights.
The most important setting is called “Choose how Bit locker-protected operating system drives can be recovered.” The setting enables the escrow of recovery keys to Active Directory.

Once this policy is enabled, you have the option to check the “Save BitLocker recovery information to AD DS for operating system drives”. Also, I would consider checking the box for “Do not enable BitLocker until recovery information is stored to AD DS for operating system drives”, as it will prevent the drive from encrypting until the recovery information is stored in AD.
Note that this same setting exists for fixed and removable drives as well.
At the root of the BitLocker section, there are three different drive encryption methods and cipher strengths for different operating system families. I suggest setting those, most importantly for Windows 10 1511 and later.

XTS-AES encryption is only available with Windows 10 1511 and later. I recommend using this algorithm, as it has much better performance than AES-CBC, an older technology considered easier to attack. Because XTS-AES only works on 1511 and up, you may want to leave removable drives at AES-CBC for compatibility.
Viewing Recovery Keys
To view BitLocker recovery keys, you need the BitLocker Recovery Password Viewer from RSAT. This tool adds an additional tab called “BitLocker Recovery” when you view a computer object from Active Directory Users and Computers. It will show you the recovery password for the computer.
If you do not have the computer name, it also adds a “Find BitLocker recovery password” option to the context menu. From this menu, you can type in the password ID displayed on the screen of a locked computer.
Securing Your Organization
Securing Windows endpoints with BitLocker and other measures in a large organization is a challenge because you have so many computers and so little time. Adaptiva offers technology that can automate security configuration management across the company. It can identify violations to security and compliance policies, including Microsoft and third-party security applications, and automatically remediate them. It has built-in checks for BitLocker, but can do a great deal more. Download this Adaptiva Endpoint Health™ key features datasheet if you would like to learn more.